
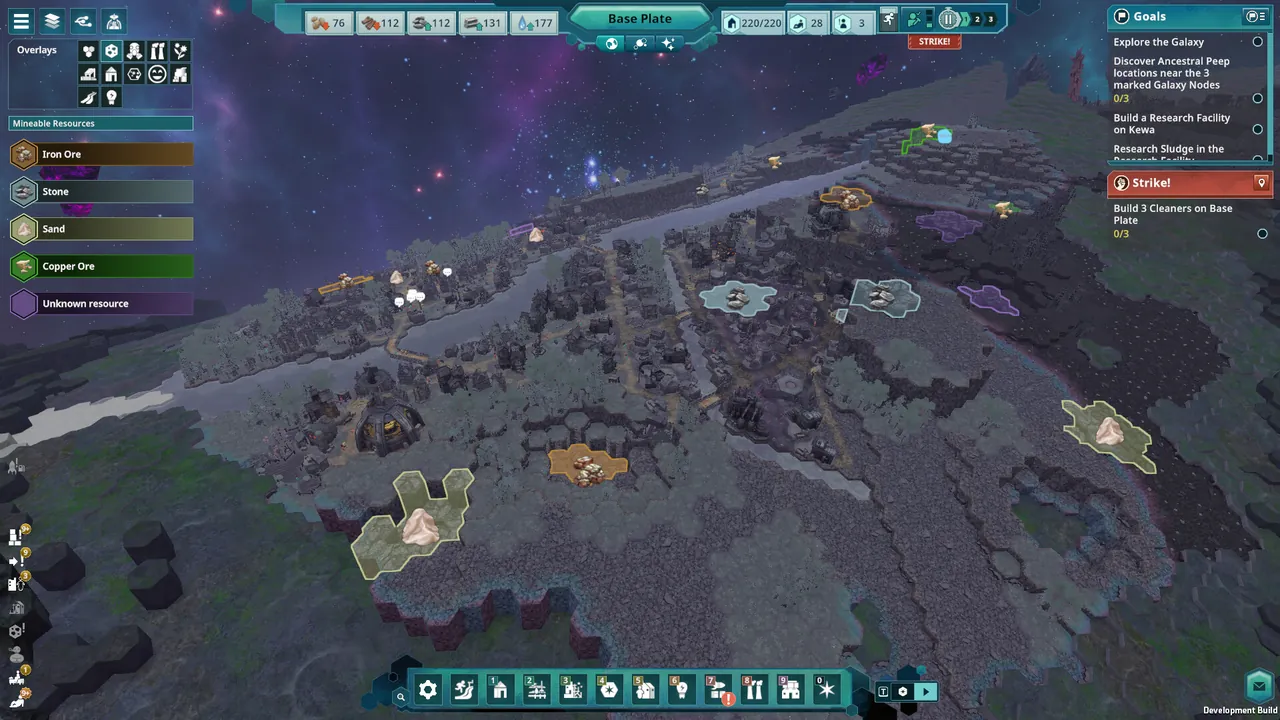
A colony in Beyond These Stars spreads across hex tiles on Kewa's back, and every structure competes for the same contoured ground. The names in this guide are drawn from the official Hooded Horse wiki and current demo builds, so treat them as the confirmed core of the roster rather than a finished catalogue. Some tuning can still change before the 1.0 release.
What Each Building Group Does
Housing and living covers the Home Spaceship and Huts, with decoration buildings giving nearby Peeps a lift in mood. The Home Spaceship anchors the settlement: it is a multi-tile structure that appears in more than one size in demo builds, and early construction hauls materials from it. Huts add the residential capacity that later expansion is staffed from, and where a Peep lives also decides where they can work — per the official wiki, jobs more than 16 tiles from home go unfilled — so housing placement is a layout decision, not a decoration one.
Gathering and production is the largest group. A Woodcutter fells trees and a Sawmill processes them into timber, a Mine reaches underground deposits, an Ore Smelter and a Metal Smelter push ore toward usable metal, and a Toolsmith turns that metal into tools. Electronics Plant handles the electronic tier, Water Pump secures drinking water, and Burner Generator produces power by burning wood. Research Facility belongs in this tier as well, because it is the building that opens research — the resources guide lists what each one draws from.
Logistics and storage keeps those producers supplied. Roads let Peeps travel between jobs, Power Line extends electricity outward from a generator, and Storage along with Storage Shed absorbs surplus so a stopped line does not starve the building behind it. Power comes with an early range rule the official wiki documents: buildings that need power must initially touch the Burner Generator, and only once Power Lines unlock can the grid stretch across roads and empty tiles. The orbital set sits here too: a Space Port can hold up to four Landing Pads, with one ship on each pad at a time. The developer diary names one landing exception: the Settlement Ship, an upgraded Home Spaceship, can establish a new planetary settlement without an existing pad. It then needs a Space Port built in the area before it can depart. The ships and landing pads guide explains that sequence.
Terraforming is the fifth group, and the official wiki describes it as the way you grow the map you get to build on. The Landscaper is the first building here — its workers dig ground, creating Debris that can be stored or stacked to raise new hills — followed by the Compost Heap, which turns Wood Waste into Compost for fertilising bare tiles, and the Tree Nursery, which supplies Saplings for new forests. The chain matters because forests both expand the breathable atmosphere around your settlement and suppress pollution, which the pollution guide explains from the cleanup side.
Services and wellbeing covers Cleaner, Dump, Apothecary, Memorial Statue, Fairground and School. A Cleaner scrubs polluted ground, while toxic areas wait for the Toxic Tile Scraper until chemical-fed Cleaners can take them on; a Dump stores waste, an Apothecary stocks the items sick Peeps recover with, a Memorial Statue lifts mood while a community mourns, and a Fairground gives celebrations a venue. These buildings look optional until they are not, and their weight grows with the settlement: sickness, mourning and strikes are all confirmed for the 1.0 release, so a large colony feels their absence far more than a starting camp does. The pollution guide explains why the cleanup half of that list matters.
Placement: Tiles, Contours and Travel
Terrain decides where a structure can stand. Kewa's surface is layered rather than flat, so a building needs a footprint whose contour matches the ground beneath it, and multi-tile designs such as the Home Spaceship are the fussiest about that match. Water released between layers floods whatever sits in its path, so plan drainage before you dig next to a production line.
Terraforming works as a placement tool, not just scenery. The official store description lists digging canals, laying top soil, planting trees and maintaining whole forests, and forests spread atmosphere outward, which widens the area you can safely build on. Planted trees also provide a renewable wood supply that no deposit can run dry. Reshape land where it changes what you can build — a canal along a boundary, top soil on a plateau you intend to farm — rather than levelling a district that already works.
Keep travel short. Peeps move across the settlement to reach their jobs, so a long detour costs time that surfaces as slower output. The official store description frames placement as a choice between following the land and reshaping it "to take advantage of adjacency bonuses and reduced travel times" — putting a producer beside the building that supplies it is the practical version of that. Road and Power Line routes follow the same logic: connect the district first, then extend outward. Community hotkey notes list a rotation control during placement, and turning a footprint is often what lets it fit a slope its default orientation cannot.
Elevation shapes how a district works. Two buildings on the same contour share a walking route, while a structure placed on a terrace above its supplier sends every delivery uphill. Where the ground refuses a route outright, no amount of road fixes it — plan the district around the barrier rather than through it.
Pro tip: Plan around the contour before you commit. Re-levelling a hillside after a production line is already running costs more than leaving a deliberate gap in the layout for the buildings you have not unlocked yet.
Build Order and Priorities
Work in the order the colony's bottlenecks appear, not the order the build menu lists. Housing staffs everything else, wood and water and power keep those buildings alive, and only then does heavy industry earn its footprint.
| Build order | Building group | Why this order |
|---|---|---|
| 1 | Housing and living (Home Spaceship, Hut) | Peeps need beds and a base before any job can be filled |
| 2 | Gathering and production (Potato Patch, Woodcutter, Sawmill, Water Pump, Burner Generator) | Food, wood, water and power keep every later building running |
| 3 | Logistics and storage (Roads, Power Line, Storage, Storage Shed) | Output only helps if it reaches the next building |
| 4 | Mining and heavy industry (Mine, Ore Smelter, Metal Smelter, Toolsmith, Electronics Plant) | Needs power and delivery routes already in place |
| 5 | Terraforming (Landscaper, Compost Heap, Tree Nursery) | Expands buildable land and controls pollution before the settlement outgrows its footprint |
| 6 | Services and wellbeing (Cleaner, Dump, Apothecary, Memorial Statue, Fairground, School) | Prevents the sickness and unhappiness that halt production |
| 7 | Orbital (Space Port, Landing Pad, Ship Builder) | Only pays off once travel is unlocked |
Two habits keep that sequence honest. Do not open a production tier before the logistics to feed it exist, because a smelter with no road or power does nothing at all. Treat services as production too: a colony that skips Cleaner and Dump pays for it in sickness and slower Peeps, and the 1.0 release adds strikes that stop part of a line when enough workers are unhappy. The wider arc of a first settlement is covered in the beginner guide, and the material flow between these buildings is traced in the production chains breakdown.
Treat the table as a starting shape rather than a rule. A colony that unlocks mining early can pull that tier forward once power and roads exist to serve it, and a map with awkward terrain may push the orbital tier well out of reach. The purpose of an order is to keep the settlement staffed and supplied at each step, so reorder it when the map gives you a reason. Fill the gap that is actually blocking output rather than the one that looks most impressive.
Sources
- Steam store page (placement, terraforming, forest atmosphere): https://store.steampowered.com/app/2295060/
- Official Hooded Horse wiki, Technology tree and building roster: https://wiki.hoodedhorse.com/Beyond_These_Stars/Technology_tree
- Official Hooded Horse wiki, Peeps (16-tile work radius): https://wiki.hoodedhorse.com/Beyond_These_Stars/Peeps
- Official Hooded Horse wiki, Burner Generator (power range, soot): https://wiki.hoodedhorse.com/Beyond_These_Stars/Burner_Generator
- Official Hooded Horse wiki, Terraforming (Landscaper, Compost Heap, Tree Nursery): https://wiki.hoodedhorse.com/Beyond_These_Stars/Terraforming
- Steam announcement, "Our Plans Are Changing…" (1.0 endgame buildings, Early Access cancelled): https://store.steampowered.com/news/app/2295060/view/1826362059931486
- Steam announcement, "Developer Diary: Space Ships" (Space Port, Landing Pad, Ship Builder): https://store.steampowered.com/news/app/2295060/view/1784506359047856
- Steam announcement, "Dev Blog #23 Strikes" (strikes halt part of production): https://store.steampowered.com/news/app/2295060/view/1830163047253538
- Steam announcement, "Dev Blog #25 Peep Sickness" (Apothecary, Memorial Statue): https://store.steampowered.com/news/app/2295060/view/1833968530889579
- Steam announcement, "Dev Blog #22 Celebrations" (Fairground): https://store.steampowered.com/news/app/2295060/view/1827626365751448
- Community wiki, hotkey notes (build categories, rotation, road mode, demolish): https://beyondthesestars.fandom.com/wiki/Hotkey